
Instructions:
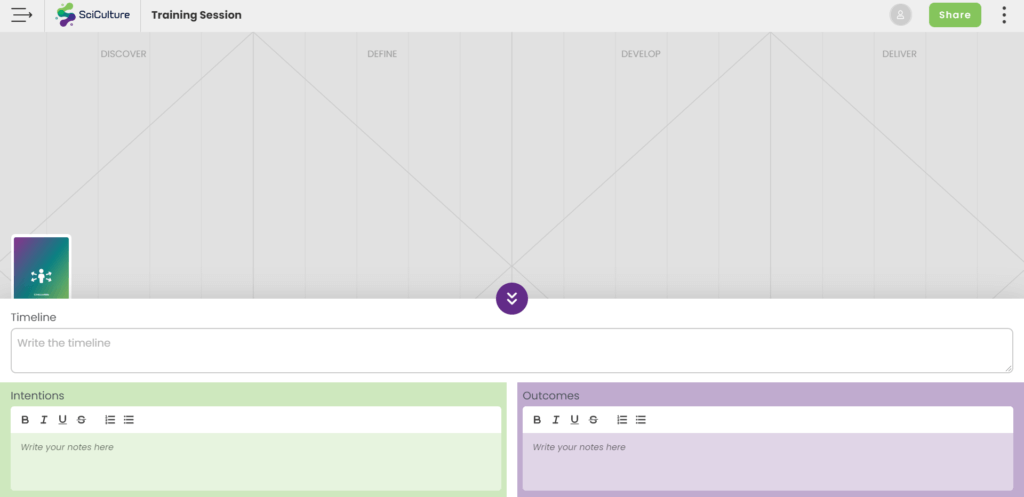
The Board: The double-diamond represents the design thinking and creative process that your participants will engage with. The intention is to encourage them to take shared ownership of the process. There is a space for you to indicate your course timeline. The double diamond can represent almost any length of the course from one day to one week or even just two hours. The longer the course, the more columns you are likely to have.
TIP: a short two-hour workshop is better suited to occupy just one ‘diamond’.
The board also has two Scribble Boxes to note your participants’ learning intentions, outcomes and types of learning. They also help keep track of learning objectives and course outcomes if this is the language you work with.
The Cards: There is a ‘Challenge’ card and nine suits. In each suit you’ll find two versions of every card, one with a divergent triangle and one with a convergent triangle. This allows you to use the cards relevant to the process of the double diamond you’re in. All cards have a definition.
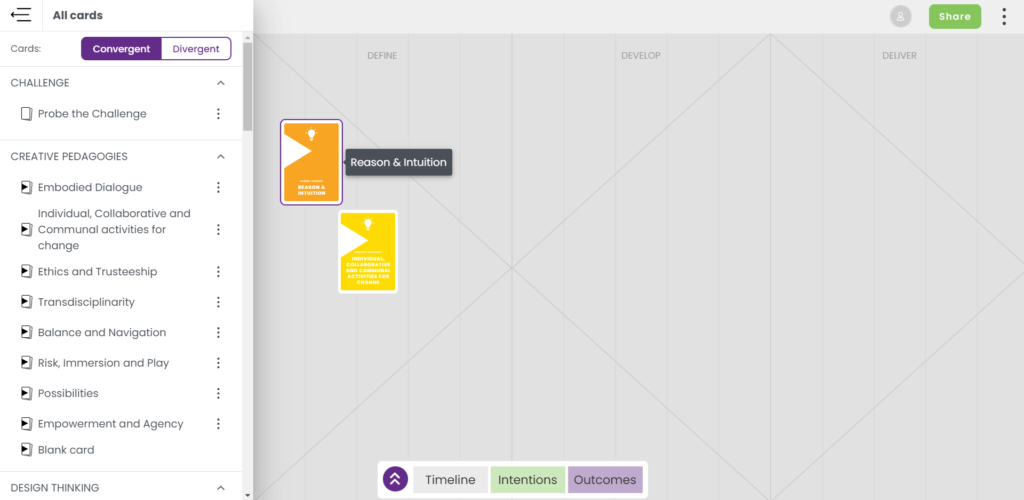
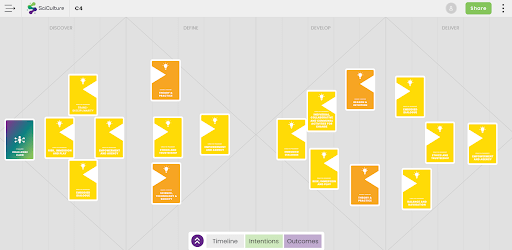
The Suits: There are four main suits that you’ll initially layout onto the board’s double diamond to create the conceptual or ‘bigger picture’ version of your course: Creative Pedagogies, Design Thinking, Reflective Perspectives and Probe the Challenge. These cards describe the flow of the course – its intensity, depth and innovative character.
For the session-by-session course version, you can then add in cards from the other five suits: Type of Teaching Block, Type of Virtual Teaching Tools, Facilitator Type, Grouping Type and Wild Cards. This will develop your ‘bigger picture’ planning into concrete teaching plans.
You might first start using these CourseKit cards in the specific order we describe above, and we would recommend this approach for beginners. However, you can also start with the session-by-session part of the course and think about the conceptual layer later on. CourseKit leaves space for both options.
Card play instructions
Work through these instructions step-by-step with your team to plan your course (this is likely to take at least 2–3 hours).
STEP 1: Get set up: Position the board so that all of your players can see it. Have the nine suits and your ‘Challenge’ card ready. If working face-to-face, lay all the cards out on the table so every possibility is seen. Make sure to have a wipe-clean marker available too!
STEP 2: What actions to take first?: Decide on your Challenge and make sure that it incorporates input from all disciplines represented by participating players (i.e. collaborators). Remember, your Challenge should be broad and open to multiple responses. It can be helpful to phrase it as a question, for example: How can we enhance the well-being of cities? Or, what might education look like in 2050?

Write/type your challenge on the challenge card and place it on the designated space of your board. If known in advance, write your timeline into the allocated space on the Board. (For example: Monday to Friday of a week-long course or week-by-week of a three-month term/semester.)
STEP 3: What to do next?: Discuss and (tentatively) agree on what you want your participants to gain from your course by responding to the challenge. Dependent on your circumstances these may be your course/module/unit learning aims or intentions. Type or write these into the Scribble Box on the left-hand side at the bottom of the board.
TIP: post-it notes are very handy and moveable.
For example, the SciCulture course learning aims are to develop knowledge, skills and understanding in arts, science and entrepreneurship alongside transdisciplinary and collaborative skills, and ethical practices.
STEP 4: Plan the ‘bigger picture’ of your course: Design the ‘bigger picture’, or the conceptual layer of your course/unit/module, to find its ‘essence’ (the core meaning of what you are discussing).
With your collaborators, start by choosing which divergent Creative Pedagogy, Design Thinking, Reflective Perspective and Probing the Challenge cards to play first, then begin the Discover phase of the double diamond.
Lay your first cards in the first column next to the Challenge Card within the double diamond. How you play the cards is absolutely up to you. Then continue through the Define (convergent), Develop (divergent) and Deliver (convergent) phases of the double diamond.
At this level of play, columns are likely to contain four to six Cards, but it may be fewer. Continue to build up your learning intentions/intensities in the Scribble Box on the left-hand side at the bottom as you work.
Don’t forget to use your logbook to dialogue with/about/around your course, as well as articulating your empathy with the learning process of your participants.
Remember, your intention in the first part of the double diamond is to encourage divergent thinking and possibilities – a playful beginning, characterised by dialogue, is often helpful. If you need some help see these teaching approaches.
STEP 5: Plan your course session-by-session: Once you have developed your ‘bigger picture’ plan, you can move on to session-by-session planning. For this step you might want to start noting learning outcomes or developments down in the right-hand side Scribble Box.
Now you have your starting point, alongside the Challenge card, for your Session-By-Session planning! Start to embellish your existing plan with cards from other suits: Type of Teaching Block, Facilitator Type, Grouping Type, Type of Virtual Teaching Tool and Wild Cards. If working face-to-face, you might want to space your Cards to leave room between columns to differentiate actual teaching time blocks. Note: at this level of play, columns are likely to contain six to nine cards.
Plentiful learning processes emerge from your planning of Teaching Blocks, Facilitator Types and other cards. Too many types of learning exist to mention in a meaningful and supportive suit, so please feel free to make notes for yourself in the scribble boxes about the learning types you want to use.
STEP 6: Reflecting on the essentials: Once you’ve completed Steps 4 and 5 above, you’ll need to step back from the Board and read your Logbook. Reflect on your notes and ask questions such as: Does the course have intensity, liveliness and connectedness in the right places? Is it agile enough to respond to what the participants generate? Does it have a good balance between the known and the ambiguous, ethical and pragmatic? Can its essence (its core message and value) be felt as a connecting thread? Does it balance individual, collaborative and communal working? Will participants be able to take risks safely?
These are the qualities of dynamic systems, but it’s important to reflect on the process of one of the eight Creative Pedagogies: Balance and Navigation.
Once you’ve tweaked your course in response to these questions, you’re ready to start planning the details of your sessions.
Good luck!